Overview
FastAPI is a modern, high-performance, production-ready asynchronous Python web framework designed for building APIs using standard Python type hints. In this tutorial, you can learn how to build a complete CRUD application that integrates MongoDB and FastAPI.
Non-Blocking Architecture
FastAPI’s asynchronous, non-blocking architecture allows it to handle thousands
of concurrent requests without relying on multi-threading. It uses Python’s
asyncio event loop to manage concurrency through coroutines. This allows the
application to suspend a request while waiting queries to return. This reduces
memory usage and can reduce latency.
Built-in Features and Integrations
FastAPI has several built-in integrations and features including the following components:
Pydantic for automatic data parsing, validation, and serialization
OpenAPI and JSON Schema for auto-generated, interactive API documentation
A lightweight, Pythonic Dependency Injection system for clean and testable code
Support for OAuth2 and JWT authentication and authorization
These features minimize boilerplate code to simplify development. For more information about FastAPI's capabilities, see the FastAPI website.
Tutorial
You can find the completed sample app for this tutorial in the MongoDB with FastAPI sample project GitHub repository.
Prerequisites
Ensure you have the following components installed and set up before you start this tutorial:
Python v3.9 - 3.11
A MongoDB Atlas cluster. To learn how to set up a cluster, see the Getting Started guide for more information.
Set-up
Install dependencies, connect to MongoDB and start your FastAPI server:
Clone the example code example
Run the following command in your terminal to clone the code from the mongodb-pymongo-fastapi GitHub repository:
git clone git@github.com:mongodb-developer/mongodb-pymongo-fastapi.git cd mongodb-pymongo-fastapi
Install the required dependencies
Tip
Activate a virtual environment
Installing your Python dependencies in a virtualenv allows you to install
versions of your libraries for individual projects. Before running any
pip commands, ensure your virtualenv is active.
Run the following command in your terminal to install the dependencies
listed in the requirements.txt file:
cd mongodb-pymongo-fastapi pip install -r requirements.txt
It might take a few moments to download and install your dependencies.
Retrieve your connection string
Follow the Find Your MongoDB Atlas Connection String guide to retrieve your connection string.
Run the following code in your terminal to create an environment variable to store your connection string:
export MONGODB_URL="mongodb+srv://<username>:<password>@<url>/<db>?retryWrites=true&w=majority"
Tip
Reset Environment Variables
Anytime you start a new terminal session, you will must reset this environment variable. You can use direnv to make this process easier.
Connect the Application to Your Cluster
All the code for the example application is stored in the app.py file in the mongodb-pymongo-fastapi GitHub repository.
Use this code to perform the following actions:
Connect to your MongoDB Atlas cluster by using the
AsyncMongoClient()method with theMONGODB_URLenvironment variable and specifying the database namedcollege.Create a pointer to the
collegedatabase.Create a pointer to the
studentscollection
client = AsyncMongoClient(os.environ["MONGODB_URL"],server_api=pymongo.server_api.ServerApi(version="1", strict=True,deprecation_errors=True)) db = client.get_database("college") student_collection = db.get_collection("students")
The AsyncMongoClient() call includes a server_api parameter to enable
the Stable API feature on your connection. Make sure your deployment uses
MongoDB servers with version 5.0 or later. For more information, see the Stable
API section of this guide.
Review the Database Models
This application has three models, the StudentModel, the
UpdateStudentModel, and the StudentCollection. These models are
defined in the app.py file.
All the models in the application build on the Pydantic BaseModel, which provides basic
type validation, JSON parsing and serialization, and basic error handling.
StudentModel Class
StudentModel is the primary model used as the response model for the
majority of the endpoints.
MongoDB uses _id as the default identifier for documents. However, in
Pydantic, field names that start with an underscore are treated as private
attributes and cannot be assigned values directly. To work around this, we can
name the field id in the Pydantic model, but given an alias of _id so it
maps correctly to MongoDB.
The id field is of type PyObjectId, a custom type annotated with a
BeforeValidator that coerces the value into a string. This ensures that
MongoDB's ObjectId can be accepted and serialized properly by the model.
This setup requires the following model_config options:
populate_by_name=True: Allows the model to be initialized using either the field name (id) or its alias (_id)arbitrary_types_allowed=True: Enables support for custom types such asPyObjectId
The id field is also defined as optional with a default value of None,
so a new StudentModel instance can be created without specifying an id.
MongoDB automatically generates an _id when the document is inserted, and
this value is returned in API responses.
The model_config also includes a json_schema_extra setting that defines
example data used in FastAPI's autogenerated OpenAPI (Swagger) documentation.
You can see the StudentModel definition in the following code in the
app.py file:
# Represents an ObjectId field in the database. # It will be represented as a `str` on the model so that it can be serialized to JSON. PyObjectId = Annotated[str, BeforeValidator(str)] class StudentModel(BaseModel): """ Container for a single student record. """ # The primary key for the StudentModel, stored as a `str` on the instance. # This will be aliased to ``_id`` when sent to MongoDB, # but provided as ``id`` in the API requests and responses. id: Optional[PyObjectId] = Field(alias="_id", default=None) name: str = Field(...) email: EmailStr = Field(...) course: str = Field(...) gpa: float = Field(..., le=4.0) model_config = ConfigDict( populate_by_name=True, arbitrary_types_allowed=True, json_schema_extra={ "example": { "name": "Jane Doe", "email": "jdoe@example.com", "course": "Experiments, Science, and Fashion in Nanophotonics", "gpa": 3.0, } }, )
UpdateStudentModel Class
The UpdateStudentModel has the following key differences from the
StudentModel:
It does not have an
idattribute, as this cannot be modifiedAll fields are optional, so you can supply only the fields you want to update
The
mongo_configvariables includesjson_encoders={ObjectId: str}
FastAPI encodes and decodes data as JSON strings, which do not support
all the data types that MongoDB's BSON data type can store. BSON has
support for more non-JSON-native data types, including ObjectId
which is used for the default UUID attribute, _id. Because of this,
you must convert ObjectId objects to strings before storing them in
the _id field. The json_encoders setting instructs Pydantic to do this.
For more information about how BSON compares to JSON, see the JSON and BSON MongoDB article.
You can see the UpdateStudentModel definition in the following code in the app.py file:
class UpdateStudentModel(BaseModel): """ A set of optional updates to be made to a document in the database. """ name: Optional[str] = None email: Optional[EmailStr] = None course: Optional[str] = None gpa: Optional[float] = None model_config = ConfigDict( arbitrary_types_allowed=True, json_encoders={ObjectId: str}, json_schema_extra={ "example": { "name": "Jane Doe", "email": "jdoe@example.com", "course": "Experiments, Science, and Fashion in anophotonics", "gpa": 3.0, } }, )
StudentCollection Class
The StudentCollection class is defined to encapsulate a list of
StudentModel instances. The purpose of this endpoint is to provide some
protection from JSON Hijacking, where a malicious user attempts to access
sensitive data by exploiting how browsers handle JSON arrays. For more
information, you can read the JSON Hijacking article on the
Haacked website.
You can see the StudentCollection definition in the following code in the
app.py file:
class StudentCollection(BaseModel): """ A container holding a list of `StudentModel` instances """ students: List[StudentModel]
Review the Application Routes
The following table describes the application routes defined in this application:
Route | Action |
|---|---|
| Create a new student |
| View a list of all students |
| View a single student |
| Update a student |
| Delete a student |
These routes are defined in the app.py file as described in the following
sections:
Student Routes
The create_student route receives the new student data as a JSON
string in a POST request. It decodes the JSON request body into a
Python dictionary, then passes it to your MongoDB client.
The insert_one method response includes the _id of the newly
created student, provided as id because this endpoint specifies
response_model_by_alias=False in the post decorator call. After
inserting the new student, the method uses the inserted_id to find the
correct document and return this in the JSONResponse.
FastAPI returns an HTTP 200 status code by default, but this route returns
a 201 ("Created") to explicitly indicate that the student was created.
You can see the create_student definition in the following code in the
app.py file:
async def create_student(student: StudentModel = Body(...)): """ Insert a new student record. A unique ``id`` will be created and provided in the response. """ new_student = student.model_dump(by_alias=True, exclude=["id"]) result = await student_collection.insert_one(new_student) new_student["_id"] = result.inserted_id return new_student
Read Routes
The application has one route for viewing all students, and one for viewing an
individual student, specified by their id.
You can see the list_students definition in the following code in the
app.py file:
async def list_students(): """ List all the student data in the database. The response is unpaginated and limited to 1000 results. """ return StudentCollection(students=await student_collection.find().to_list(1000))
Note
Results Pagination
This example uses the to_list() method; but in a real application,
we recommend using the skip and limit parameters
in find to paginate your results.
The student detail route has a path parameter of id, which FastAPI
passes as an argument to the show_student function. It uses the id
to attempt to find the corresponding student in the database.
If a document with the specified id does not exist, then it raises an
HTTPException with a status of 404.
You can see the show_students definition in the following code in the app.py file:
async def show_student(id: str): """ Get the record for a specific student, looked up by ``id``. """ if ( student := await student_collection.find_one({"_id": ObjectId(id)}) ) is not None: return student raise HTTPException(status_code=404, detail="Student {id} not found")
Update Route
The update_student route functions similarly to a combination of the
create_student and the show_student routes. It receives the id
of the student to update, and the new data in the JSON body.
This route iterates over all the parameters in the received data and only modifies the parameters provided. It uses the find_one_and_update() to $set method.
If there are no fields to update, then it returns the original StudentModel
document. If it cannot find a matching document to update or return, then it
raises a 404 error.
You can see the update_student definition in the following code in the
app.py file:
async def update_student(id: str, student: UpdateStudentModel = Body(...)): """ Update individual fields of an existing student record. Only the provided fields will be updated. Any missing or `null` fields will be ignored. """ student = { k: v for k, v in student.model_dump(by_alias=True).items() if v is not None } if len(student) >= 1: update_result = await student_collection.find_one_and_update( {"_id": ObjectId(id)}, {"$set": student}, return_document=ReturnDocument.AFTER, ) if update_result is not None: return update_result else: raise HTTPException(status_code=404, detail=f"Student {id} not found") # The update is empty, so return the matching document: if (existing_student := await student_collection.find_one({"_id": ObjectId(id)})) is not None: return existing_student raise HTTPException(status_code=404, detail=f"Student {id} not found")
Delete Route
The delete_student acts on a single document, so you must supply
an id in the URL. If it finds a matching document and successfully
deletes it, then it returns an HTTP status of 204 ("No Content") and
does not return a document. If it cannot find a student with the
specified id, then it returns a 404 error.
You can see the delete_student definition in the following code in the
app.py file:
async def delete_student(id: str): """ Remove a single student record from the database. """ delete_result = await student_collection.delete_one({"_id": ObjectId(id)}) if delete_result.deleted_count == 1: return Response(status_code=status.HTTP_204_NO_CONTENT) raise HTTPException(status_code=404, detail=f"Student {id} not found")
Test the API
Now that you understand how the application works, you can start using your endpoints. Use the following steps to send requests to your endpoints and see the results:
Send requests
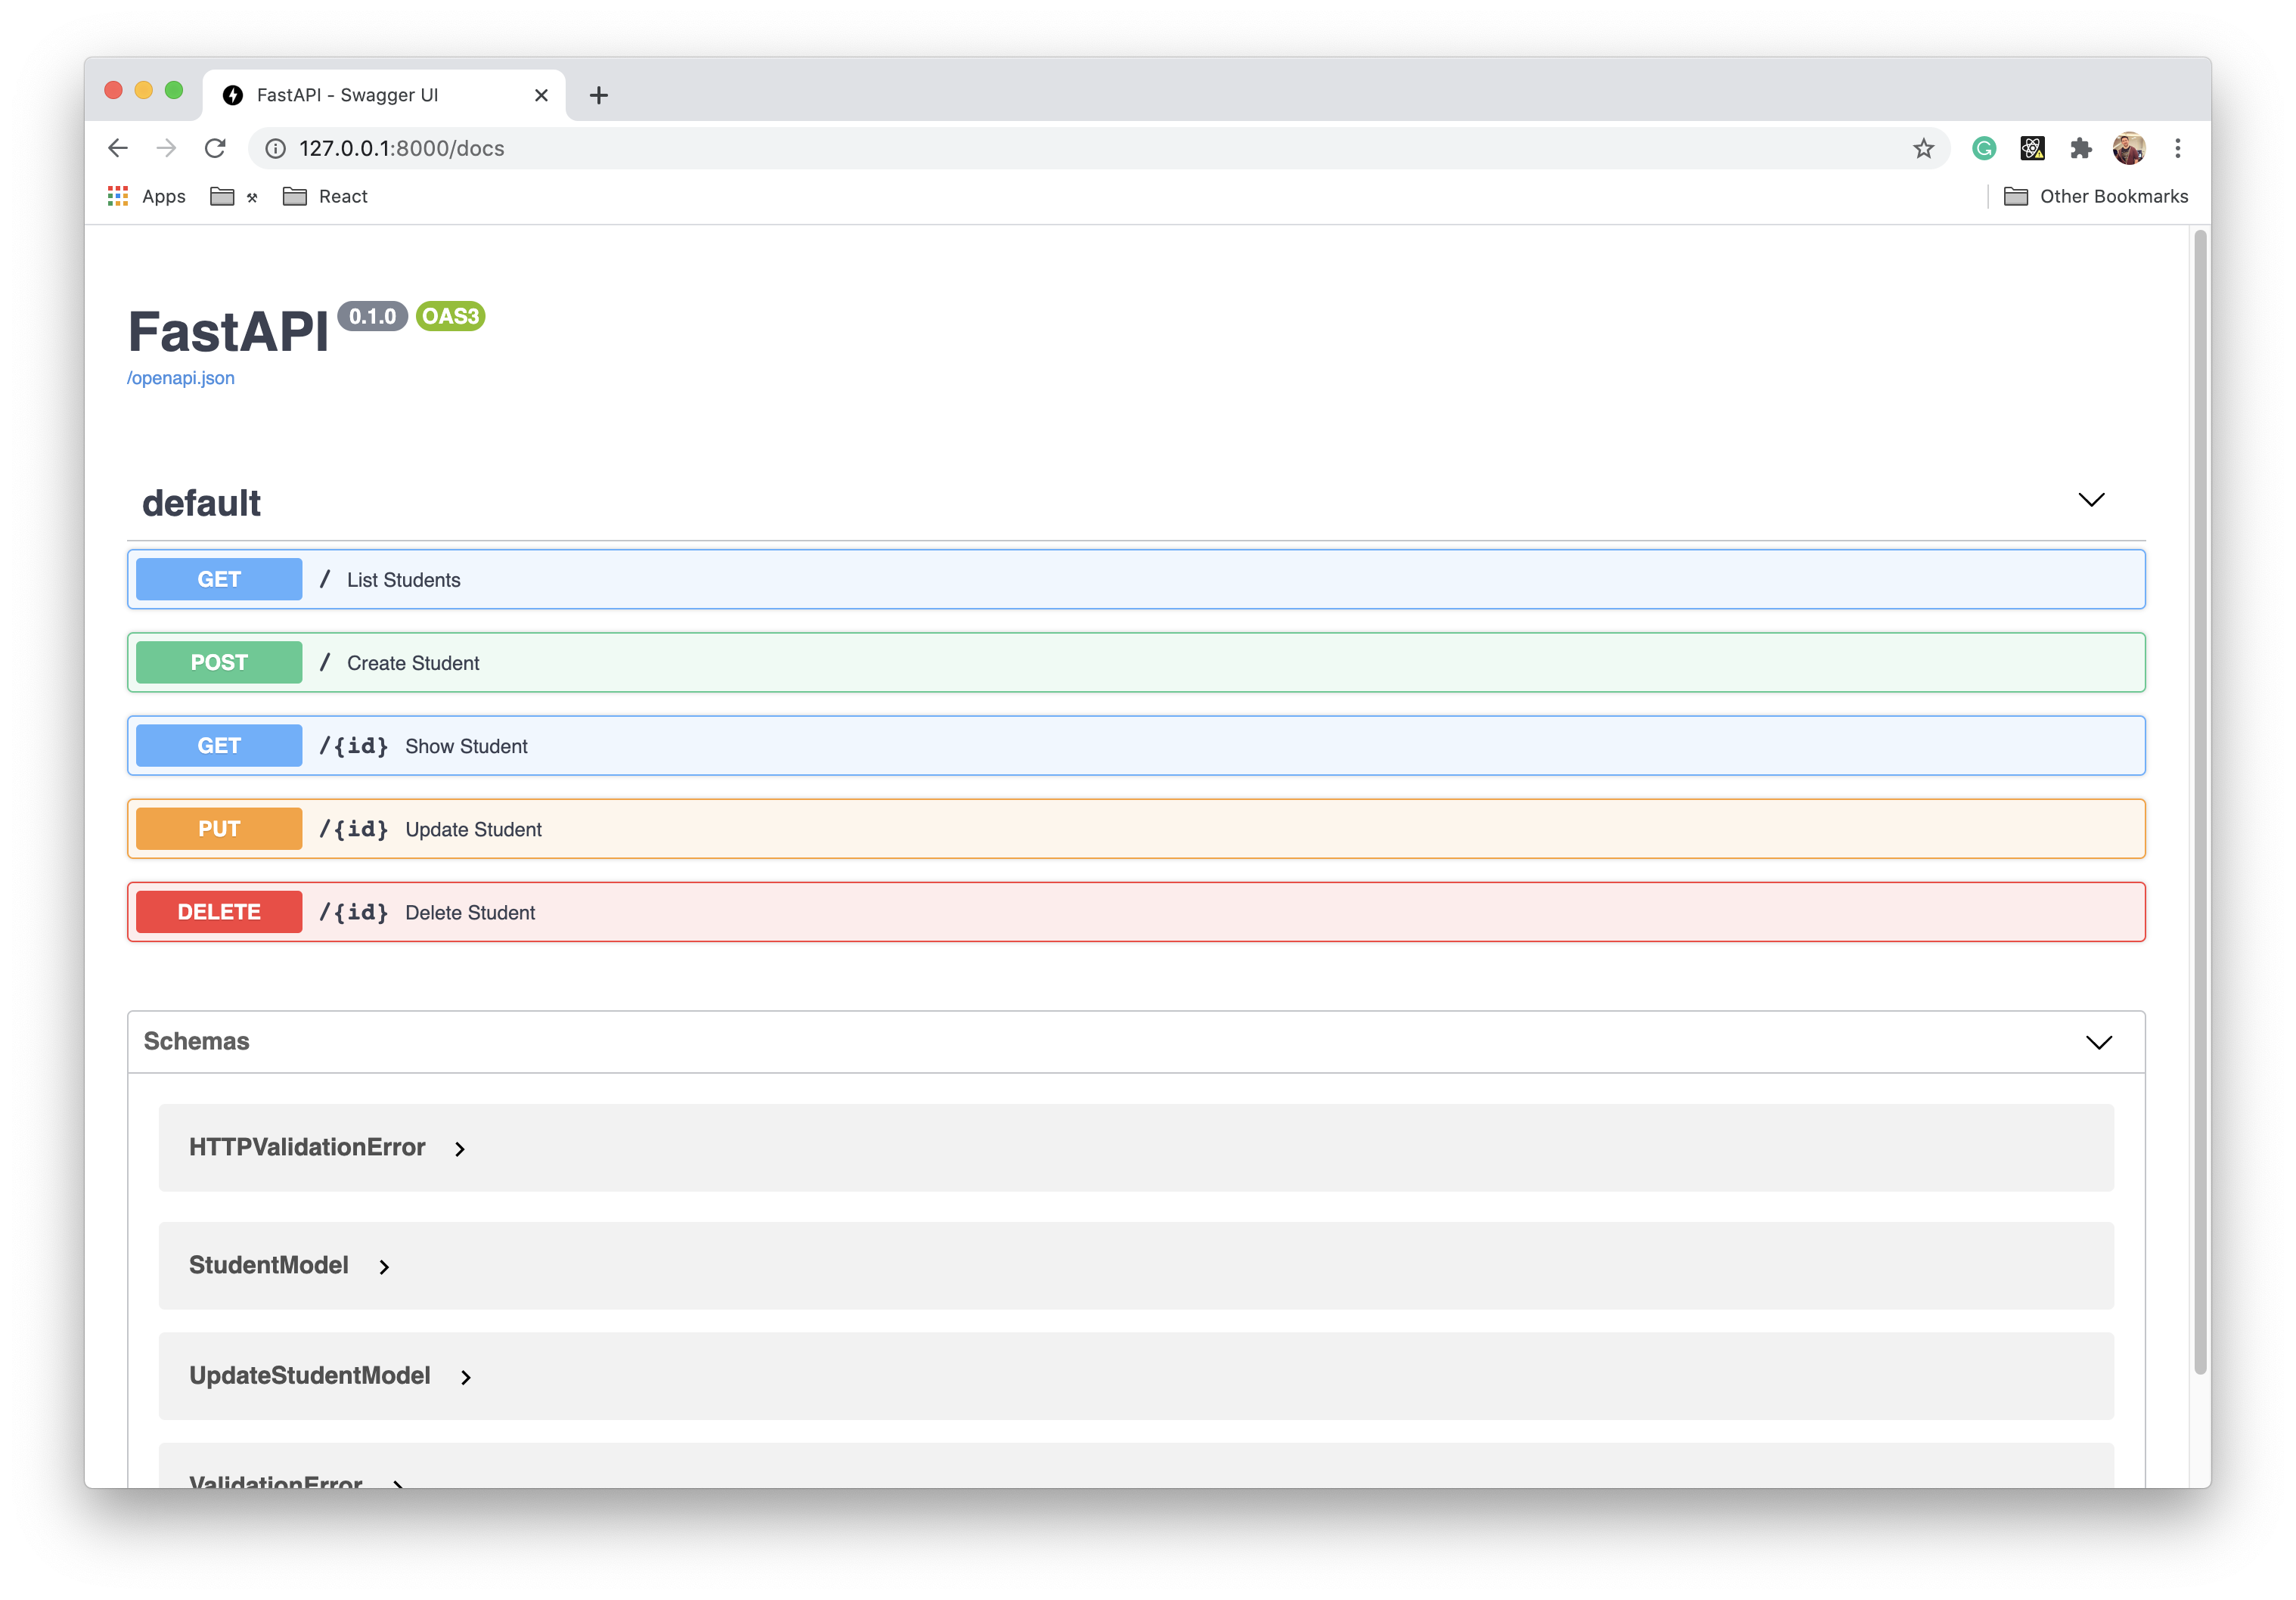
Navigate to http://127.0.0.1:8000/docs. The following image shows interface generated by the FastAPI server.
Click on the endpoint you want to send a request to, fill in any
necessary parameters, and click Execute.
In the Show Student endpoint, you can see the sample data
defined in the StudentModel.model_config variable.
Tip
Use curl to test your API
If you prefer using the command line, you can send a request by using
the curl command, such as this one:
curl -X POST "http://127.0.0.1:8000/students/" \ -H "Content-Type: application/json" \ -d '{"name": "Jane Doe", "email": "jdoe@example.com", "course": "Physics", "gpa": 3.8}'
Next Steps
Now that you have a basic understanding of how FastAPI integrates with MongoDB and the PyMongo Async driver, you can add more features. The following list includes some suggestions for how you could add to this application:
More Resources
For more information about FastAPI integration, see the following resources:
- MongoDB's Full Stack FastAPI App Generator
Introducing the FARM stack (FastAPI, React and MongoDB) blog post
For support or to contribute to the MongoDB Community, see the MongoDB Developer Community.